Pages

Search Within The Blog....

Loading

30/10/2011

How to fix yahoo voice in chatrooms

Having a trouble with yahoo voice? Here is the trick and tool that can make your yahoo voice enable in chat rooms. All you need this to patch a host file. There are 2 ways to do that manually and automatic (with software)
Manually
  1. Go to C: or your window drive
  2. Windows
  3. System32
  4. Drivers
  5. Etc
In etc folder you will find Host file. Open it with text editor wordpad or notepad etc
Add  68.180.210.116  vc.yahoo.com anywhere in the file and save. Thats All ;)


Using A software


Fixed Voice By Max Group Update 10-30


for win7 and vista (run as administrator)......

Download Now

Just Restart Yahoo Messenger and any other client ;)

If program gives any kind of error don't worry, just install the missing files package and it will start working
Download Missing Files Now

18/10/2011

10 Solid Tips to Safeguard Your Facebook Privacy

Facebook statistics show that it has 250 million active users each with an average 120 friends. More than 1 billion photos are uploaded every month by its users, over 70% of whom use applications like games and quizzes in Facebook. Unfortunately, most users don’t know the implications of entering personal information, making friends, and playing games on Facebook.
This guide will show what you can (and cannot) do to safeguard your Facebook privacy.

1. Organize Friends in Lists

What do you do when your boss, mother-in-law, or a casual web acquaintance sends you a friend request on Facebook? Use Friend Lists. Friend Lists are the foundation of your Facebook privacy settings. Select Friends from the top menu, and use the Create link to create friend lists like Co-workers, Family, College Friends, etc. Your friends can’t see your lists, so you can name them whatever you like.
facebook privacy
Tip: On your left sidebar, all your friend lists may not show up by default. Click More to see all of them, and drag and drop those you want above the separator.

2. Customize Profile Privacy

Click Settings > Privacy Settings > Profile. Select which parts of your profile will be seen by whom.
facebook privacy Profile
If you choose Customize in the drop down, you can be more specific. This is where the Friend Lists you created before become really useful.

facebook privacy Customize
Also go to the Contact Information tab and choose how you want your contact information to be shared on the Internet.

3. Set Facebook Privacy Level of Photo Albums

On the Photos tab of your profile page, click Album Privacy. Here again, you can use your Friend Lists to set the privacy for each photo album.
facebook privacy - Albums
Note that your profile pictures go into a special album that is always visible to ALL your friends.

4. Restrict Search Visibility

Click Privacy > Search to set your visibility when someone searches Facebook for people. This is an important way to safeguard your Facebook privacy.  You can also select what will be visible in the search results.
facebook privacy - search

5. Control Automatic Wall Posts and News Feed Updates

Your actions in Facebook such as comments, likes, appear as highlights on ALL your friends’ home pages. You cannot use friend lists here, only turn them on or off.
Privacy News Feed
Go to Privacy > News Feed and Wall and choose whether you want your boss or ex-girlfriend to know that you’re in a relationship.

6. Set Facebook Wall Privacy

Go to your profile page, click Options > Settings under the status box.
Wall Privacy
Here you can control whether your friends can post to your Wall, and who can see the posts made by your friends.

7. Avoid Appearing in Advertisements

Facebook has two types of advertisements: third-party and Facebook. Third-party advertisements are currently not allowed to use your pictures, but there is a setting to disallow it if it is allowed in the future. Go to Privacy > News Feed and Wall > Facebook Ads tab to turn this off.
Privacy Third Party Ads
The Facebook ads shown to your friends are about “˜social actions’ like becoming a fan of something. You can turn this off at the bottom of the page.

8. Protect Yourself from Friends’ Applications

Go to Privacy > Applications, and click the Settings tab and uncheck all the boxes. These settings control what information about you is visible to applications installed by your friends. By default, these are set to visible. This means that your religious, sexual, and political preferences, pictures, etc. are readily available to one of the million worldwide Facebook application developers, each time any of your friends takes a quiz, plays a game, or runs any other Facebook app. This is obviously a Facebook privacy issue.
Privacy Applications
This is the most commonly misunderstood aspect of Facebook privacy. These settings control what applications installed by your friends can see about you, even if you don’t install the application yourself.
Why is this important? Because these settings will not change anything about what you are sharing with the applications you install yourself. For that, go to the next step.

9. Privacy from Your Applications

There is no way to control what applications see about you; it is an all-or-nothing affair. Take this quiz developed by the American Civil Liberties Union to check what anonymous application developers can know about you and your friends each time you take a quiz.
The Burton Group’s Identity Blog features the Facebook Privacy Mirror, an application that you can use to find out what applications know about you and your friends. If you really want to see exactly what profile data of each of your friends is visible to application developers, Privacy Mirror shows it in detail.
The only thing you can do is to authorize only those applications you require and trust. Go to Settings > Application Settings from the top menu. Change the drop-down from Recently Used to Authorized. Here you can see all the applications you have authorized to get access to ALL your profile information. Remove the ones you no longer need.
Authorized Apps
Also check the list of applications Allowed to Post and Granted Additional Permissions to remove unwanted ones.

10. Quitting Facebook? Delete, Don’t Just De-Activate Your Account

You can easily deactivate your account in Facebook from the Settings page. But deactivation will retain all your profile information within Facebook, including pictures, friends, etc. If you want to permanently delete your Facebook account, click here to submit a deletion request. Note that:
  1. There is an unspecified delay between submitting your delete request and actual deletion.
  2. If you login to Facebook, your deletion request is automatically cancelled.
  3. There doesn’t seem to be any way to confirm that your request was completed.
  4. Even after permanent deletion, Facebook says that copies of your photos may remain on their servers for technical reasons.
Also, note that once in a while, there is news of a Facebook hack or leak that can expose your information on the Internet. It is better to be safe than sorry by avoiding using Facebook for anything that may embarrass you.

15/10/2011

9 Facebook applications for earning real money

    facebook
Did you know you can sell things on your Facebook profile? Well, you can with the help of a couple handy applications. Whether it be your own music if you’re a musician, a shirt you designed, or old junk you have laying around, there’s probably an application out there that can help you earn some extra dough.

    cafepress.com
CafePress – Pretty much everyone has heard of CafePress, and with this Facebook app you can start selling whatever you have on your store via your profile.
    e3buy
e3buy Auction – Works with the e3buy auction site so you can add auctions to your profile as well as open a store.
    ebay
eBay – From the best known of the online auction houses, highlight anything you’re selling on eBay to your friends on Facebook.
    FlameTunes
FlameTunes – Are you a musician? Want to sell your own music on your profile? This is the application for you.
    Garage Sale
Garage Sale – In association with Buy.com, Garage Sale allows you to sell your items to your friends, like that box of old books, your bike, etc.
    Lemonade
Lemonade – Works just like it’s parent site, Lemonade.com. Pick items you like from a selection of sites, add the widget to your profile, make a commission on anything that sells.
    MusicBlaster
Music Blaster – An application that works with BlastMyMusic. Promote small musical acts and earn a 5% commission on sales of their music.
    Zazzle
My Merch Store – Create your products with Zazzle and then you can sell them on their website as well as via your Facebook profile.
    shopit
Shopit – Got some spare CDs you need to dump? Regretting that HD DVD player you bought? Create a simple store and sell off your items to your friends via this store application.

07/10/2011

Blogger search widget not working?

Here’s the solution:

Create a Blogger search widget

Login to your Blogger account and head over to Layout > Page Elements. Click on Add a Gadget at the bottom of the page and select HTML/Javascript.
In the Title field, enter Search or something similar. In Content, paste the following code:
<form action="search" name="input" method="get">
<input value="Search" name="q" size="20" type="text"/>
<input value="Go!" type="submit"/>
</form>
Hit Save and position the widget in the desired location. That’s it!

06/10/2011

How to use proxy with internet explorer

Configuring Your Browser for Manual Proxy

Using Internet Explorer - Windows OS's

Manual Proxy works with all versions of Internet Explorer provided by Microsoft (version 5.0 and up). However, the proxy will not work with a proprietary browser such as the version of Internet Explorer provided by AOL or Juno, the reason being that these browsers have been stripped down and reduced in their functionality so that even though you can enter the settings, the browser will not configure properly. Users can work around this by either running a Windows Update and downloading a version of Internet Explorer from Microsoft or by downloading Netscape from our FTP Site (from on campus) or from Netscape's main page.
  • Open up Internet Explorer. 

  • Click on the Tools Menu.
  • Go to Internet Options.
    • Click on the following thumbnail to enlarge picture: 

  • Click on the Connections Tab.
  • If you are connecting to the Internet with a standard 56K dial-up, click the Button to the right of the Internet Connection in the white box.
    • This will open up the settings for your Internet Connection.
      • Click on the following thumbnail to enlarge picture: 

    • Click on the checkbox for Use A Proxy Server for This Connection.
    • Type proxy.uconn.edu into the Address bar and 80 into the Port bar.
  • If you are connecting to the Internet with a Cable or DSL Service, click the button towards the bottom of the Connections tab.
    • This will open up the LAN (Local Area Network) Settings.
      • Click on the following thumbnail to enlarge picture: 

    • Click on the checkbox for Use A Proxy Server for This Connection.
    • Type proxy.uconn.edu into the Address bar and 80 into the Port bar.
  • Click on the button to return to Internet Options.
  • Click on the button to save the settings.
  • Click on the button to return to the Browser.
  • Internet Explorer for Windows OS's is now configured for Manual Proxy use.

Internet Explorer for Macintosh

OS X

  • Open up the System Preferences.
    • Click on the following thumbnail to enlarge picture: 

  • Click on the Network Icon in the Internet and Network Section.
  • When the Network Section opens, click the Proxies tab.
    • Click on the following thumbnail to enlarge picture: 

  • Check the boxes for both FTP and HTTP
  • Type proxy.uconn.edu in both address bars
  • Set the Port to 80.
  • Hit the Apply Now button and Internet Explorer will set up for Manual Proxy under Mac OSX.

OS 9.2 and Under

  • Open Up Internet Explorer.
    • Click on the following thumbnail to enlarge picture: 

  • Go to Edit and Preferences
    • Click on the following thumbnail to enlarge picture: 

  • In the right windows, scroll down to Network and Proxies.
  • Place a check in the box next to Web Proxy
  • Type proxy.uconn.edu into the address bar.
  • Click the button.
    • Click on the following thumbnail to enlarge picture: 

  • In the Address Bar, type proxy.uconn.edu.
  • In the Port Field, type 80.
  • Click the button.
  • Click the button.
  • Internet Explorer will now be set up for Manual Proxy under Mac OS 9.2 and under.

Using Netscape

Netscape Browser v.8.1 is the current browser version and is downloadable from http://www.netscape.com. It works on Windows operating systems XP, 2000, 98, SE and ME.
There is no difference in setup between Windows or Macintosh versions of Netscape.

Using Netscape Browser v.8.1

  • Open up Netscape Browser.
  • Click on Tools > Options > General > OK.
  • Under 'Connection,' click the 'Connection Settings...' button.
  • Select the Manual Proxy Configuration radio button option.
  • For HTTP and FTP, enter proxy.uconn.edu into the URL box.
  • Set Ports to 80 in the HTTP and FTP Port fields.
  • Click on the button.
  • Netscape Browser is now configured for Manual Proxy use.

Using Netscape Navigator v.7.1

  • Open up Netscape.
  • Click on Edit > Preferences.
  • Click the arrow to the left of 'Advanced.'
  • Click on 'Proxies'
  • Select Manual Proxy Configuration radio button option.
  • In the HTTP and FTP fields, enter proxy.uconn.edu
  • Set the Ports to 80 in the HTTP and FTP Port fields.
  • Click on the button.
  • Netscape Navigator is now configured for Manual Proxy use.

Using Firefox

(These instructions were based on Firefox v.1.5.0.1)
  • Click Tools > Options.
  • Click on 'General'
  • Click 'Connection Settings...' under the 'Connection' section
  • Select 'Manual proxy configuration' radio button
  • Enter proxy.uconn.edu in the FTP and HTTP fields
  • Enter 80 in the FTP and HTTP Port fields
  • Click OK to save settings
  • Click OK to close options group
  • Firefox is now configured to use Manual Proxy.

05/10/2011

Fastest goal keeper. Amazing goal keeping.

Amazing goal save in the history of football

Funny panda video

How to wake up your friend

Amazing 11 year old athlete

"The kid you're about to see just turned 11, and his talents will blow you away"


The NeoCube - The greatest device ever!!

The NeoCube is composed of 216 individual high-energy sphere magnets, which can be formed into BILLIONS of shapes and patterns. It is highly addictive!

Buy one here: http://www.TheNeoCube.com
We ship worldwide every day!

How to Fix User Folders Showing Simple Folder Icon in Windows Vista?

Lots of Vista users are facing a strange problem and I'm getting lots of mails asking for the solution. The problem is, the folder icons in User folder change from special glass icons to simple folder icons.
Look at the following screenshot:

This is how the icons look in User folder which can be accessed using "%userprofile%" command or just select your username in Startmenu (just below the user pic).
But sometimes these icons (all or some) become simple default folder icons. It happens when "Desktop.ini" file becomes corrupted. Actually all these special glass icons are displayed using "desktop.ini" file which is present in each folder (hidden). Sometimes a few software make this file corrupt and these folders start showing simple folder icon.
The solution is very simple. Just replace "desktop.ini" file present in the corrupt folder with default one. The default "desktop.ini" file for each folder is given below. Just download following ZIP file, extract it and copy the default desktop.ini file and paste it in the folder which is showing corrupt icon.Windows will ask to overwrite the existing file, select "Copy & Replace".
Download Link
NOTE: Log off or End Task of "explorer.exe" from Task Manager to see the changes.

How To Fix Google Redirect Virus

I am sure as if you have been using Google you must have encountered with the problem of Google search redirect virus as it is the most common virus, infecting computers all around world, of time. Basically, this virus is coded by efficient hackers and makes users annoy as it constantly redirects you to fake websites while your search.
Fix Google Redirect Virus How To Fix Google Redirect Virus
The reason of being disastrous for this virus is that it causes high damages because it cannot be removed by using simple antivirus programs. But to get this virus out of your PC you need to own a special tool and that special tool is Google Redirect Virus Removal Tool.
Exactly what we are bringing here with us, Fix Redirect Virus Tool is made to provide permanent solution to erase this redirect virus issue from your PC and it removes the virus from the core by eliminating any kind of infection present in your PC and stops them to come in. Moreover, this dynamic software can be used on any window version and any web browser.
The makers of this unique product has cracked the way of the virus working and now it can be removed easily from any windows of your PC. Only one need to work on some easy steps while installing and rest will be done automatically by it.
Though, there are many antivirus programs available and they bet to resolve all the issues of your PC. Probably they do as well, but this virus is quite complicated as it designs in such a complicated way that it becomes quite hard to remove it from your PC. Basically, Google Redirect Virus is called a browser hijack virus which easily shows its meaning as well. Normally, Windows are able to send you exact website while redirection, but if there is Google redirect virus available, the virus will prefer its own website. IN this way, you won’t be able to connect with correct information you look for.
So, to kick out this stubborn virus, just go and grab Fix Redirect Virus Removal tool, and fix up the settings, options and windows files which get infected and changed as well.

How to Fix Your Facebook Account if You Get a Facebook Virus

Facebook viruses are becoming harder to discern. This article explains how to fix your Facebook account if you have a Facebook virus.

What Do I Do If I Have a Facebook Virus?

The first thing you have to do when you discover you have a Facebook virus is change your Facebook password. Here's how:
  1. Log in to your Facebook book account.
  2. Click Account > Account Settings.
    The My Account page appears.
  3. Click the Change link next to Password.
    Three text boxes appear.
  4. Type your current password into the Old Password text box.
  5. Type a new password into the New Password text box.
  6. Re-type the new password into the Confirm Password text box.
  7. Click the Change Password button.
Once you've changed your password, write a status update alerting your friends that you clicked on a bad link and had a Facebook virus. Tell your friends not to click on any links that appear to be from you (then refrain from posting any links for a while so people don't worry about which links are good or bad). If you know specific people received a viral link from you, head over to their Facebook Wall and delete the message from you if you can and let your friend know not to click on the link.
Finally, check to be sure the application isn't lurking on your account. It's probably not, but it's good to be sure and now is a good time to clean out the apps you're not using any more anyway. To check the apps connected to your account, follow these instructions:
  1. Go to Account > Privacy Settings.
    The Choose Your Privacy Settings page appears. At the bottom of the page is a header called Apps and Websites.
  2. Click the Edit your Settings link under Apps and Websites.
    The Apps, Games, and Websites page comes up.
  3. Click the top Edit Settings button (by Apps You Use).
    The Apps You Use page comes up listing all the apps you've allowed to have access to your account.
  4. Go through the list and be sure you know each and every one of the apps.
      If you're unsure if the app is trusted or if you want to remove an app: 
    1. Click the Edit Settings button next to the app.
    2. Click the Remove App link.
If you don't see an app that looks like it's related to the virus, that's OK. It may not be there. Changing your password is what really matters, this last bit is just insurance.

How Do I Know If a Link Is a Facebook Virus?

With every new current event, you can expect a new rash of viruses. When Osama bin Laden was killed, links surfaced on Facebook suggesting you could watch the raid or see Osama's dead body. In the last month, a particularly insidious Facebook virus was going around that sent a message claiming someone had tagged or commented on a photo of you. Many times the person who supposedly did the tagging wasn't someone you knew and many people clicked on the link. Other versions of the virus named the tagger/commenter as one of your friends. Unfortunately, when you click the link, you're taken to a blank page and most people simply think the link was bad or bogus. In actuality, the link installed a Facebook virus and started sending out bogus links to your friends. If they clicked the links, they got the virus.
One way to avoid getting a dreaded virus is to pay attention. Before you click on a link, consider the source. Is this the type of link this friend usually shares? If not, don't click. If you're tempted to click, first hover your mouse over the link and look in the lower left corner of your browser. You'll see the URL attached to that link. If it's not a URL you're familiar with, don't click the link. If you see .info in the link, I suggest not clicking the link (a link that infected my friend's account was a .info link).

How can I fix "low virtual memory" in Windows?

A memory leak is a common problem caused by poorly written or poorly debugged applications where they continually use more and more memory until you shut down the program, end the process manually or restart Microsoft Windows.
Virtual memory, also known as a page file or swap file, is a file on your hard drive (C:\pagefile.sys by default) that Windows and applications use in addition to physical memory (RAM) as needed. The default and recommended size of this file is 1.5 times the amount of physical memory. Virtual memory is the sum of physical memory and the page file. So if your computer has 512 MB RAM, it will have a 768 MB page file by default, for a total of 1.25 GB of physical + virtual memory.
Finding the source of the problem
First you need to determine which application is causing the problem.
Hit Control-Alt-Delete to bring up Task Manager (on certain XP Professional configurations you'll need to click the Task Manager button after hitting Control-Alt-Delete). You can also access Task Manager by holding down Control and Shift and pressing Escape.
Go to the Processes tab in Task Manager. Here you will see a list of all the processes (applications or parts thereof) that are running on your system. You will see the memory usage here, but in my experience this very rarely has anything to do with problems running low on virtual memory.
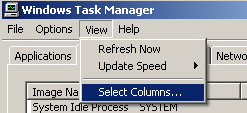
Click View, Select Columns.
Windows Task Manager View Menu
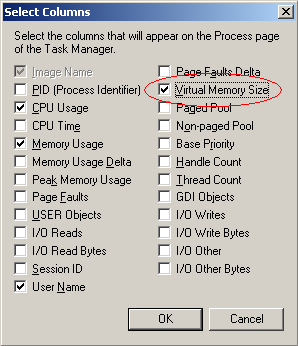
Check the Virtual Memory Size box, as circled in the screen shot below and click OK.
Windows Task Manager Virtual Memory Size
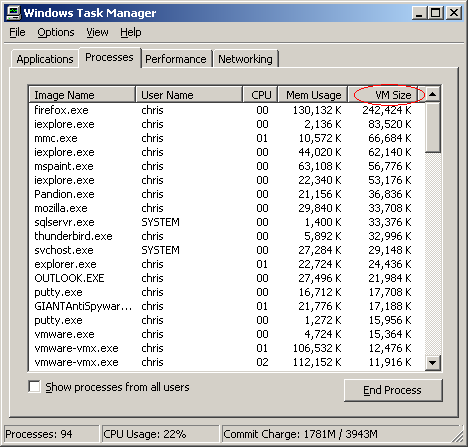
Now you have a VM Size column in your Processes tab. Click the top of the VM Size column (as circled below) twice to arrange the processes by their VM Size from largest to smallest.
Windows Task Manager: Processes
You'll see in this Task Manager shot that Mozilla Firefox is taking up the most virtual memory at about 237 MB, with Internet Explorer the next biggest at about 81 MB. (the number of KB divided by 1024 equals MB) For both, this is the consequence of leaving them open for more than a week straight. Almost every application will use more memory the longer you keep it open, though some are worse than others. This is one reason that Windows becomes more and more unresponsive the longer you keep it running, and why you end up eeding to restart your computer periodically.
Once you determine which process is using more virtual memory than it should, you need to determine what the process is. Some are pretty obvious, like winword.exe is Microsoft Word, iexplore.exe is Internet Explorer, and so on. Others aren't so obvious. The best way to determine the source of a specific process is to use a search engine to search for the Image Name as shown in Task Manager.
Resolution
Now that you know which application is causing the problem, let's resolve it.
One common thing to try is to uninstall and reinstall the offending application if possible. Searching the Internet, and checking the support site of the software vendor would be the next two steps I would try. Without knowing which application is at fault, it's difficult to recommend a specific solution.

How do I add Reactions to my blog?

How do I add Reactions to my blog?

Adding Reactions is done through the settings page of the Blog Post widget. From the Layout | Page Elements tab, simply click the 'Edit' link under the Blog Post widget and a settings window will pop up.


The Configure Blog Post window will display a handful of options, and the Reactions feature is near the bottom of the list:

To turn on Reactions just select the checkbox, and then you will be able to customize the feature by adding words of your choosing. Finally, you can choose the exact location of Reactions by dragging the widget at the bottom of the Configure Blog Post page:

How to Fix "Generic Host Process For Win32 Services Encountered A Problem and needs to close."?

It's a common error message of Windows XP "Generic Host Process For Win32 Services Encountered A Problem and needs to close." This error is occurred for several reasons. For example, if Internet Explorer suddenly crashes you will see this message. But the great thing is that you can easily solve this type of error message. This page contains the information related to fixing Generic Host Process Error.

Steps to to Fix "Generic Host Process For Win32 Services Encountered A Problem and needs to close."

You can easily solve the problem or error message "Generic Host Process For Win32 Services Encountered A Problem and needs to close." Just follow any of the following methods:
Note: Both the method is the same. If you like the simple and easy solution then only follow Method 2 and ignore Method 1.
Method 1:
1. Copy the following code [only the bold codes].
@ECHO off

Echo Coded by http://hubpages.com/profile/rancidTaste

reg  add  HKLM\SYSTEM\CurrentControlSet\Services\netbt\parameters  /v  TransportBindName  /t REG_SZ  /d  ""  /f

reg  add  HKLM\Software\Microsoft\OLE  /v  EnableDCOM  /t  REG_SZ  /d  "N"  /f

Echo Coded by http://hubpages.com/profile/rancidTaste

Echo Generic Host Error Problem Is Fixed, Press any key to continue

pause

2. Open a notepad and paste the above copied content to the notepad.
3. Save the file as GenericHostErrorProblem.bat and close it.
4. Double-click on GenericHostErrorProblem.bat and run it.
5. After fixing or removing the errors, it will ask you to press any key to finish.
6. Press any key and that's all to fix the problem Generic Host Process For Win32 Services Encountered A Problem and needs to close.

Method 2:

This is very simple and straight forward. Just download the code form the following link and run it and that's all to solve or fix the problem "Generic Host Process For Win32 Services Encountered A Problem and needs to close."
Download Generic Host Process Error Removal Tool
By following any of the above method, you can easily solve the problem Generic Host Process For Win32 Services Encountered A Problem and needs to close. If you face any problem, then put the problem in the comment section.

Blog Archive