For many people, TeamViewer needs no introduction. It's considered as one of the most efficient tool available for file or screen sharing. The program allows users to easily share their screens or provide remote access to colleges or friends.
With the help of this software, it's easier to access a co-worker's computer if they need help fixing something on the computer. It's also possible to share your screen with a friend or pretty much anybody who has the program installed on their computer as well.
The program was developed by GmbH, a German company that was founded in 2005. It's available for free download with Version 6 as the latest stable version available.
Working remotely and communicating with your boss or team mates or maybe sharing your reports is now made easier, thanks to TeamViewer. This nifty tool makes communication so much easier. It's packed with plenty of helpful features that users can take advantage of. Best part is, the entire program is offered for free as long as it's not for corporate or commercial use.
Some of its specific features include having the capacity to resize the screen that your viewer can see. It also allows you to choose between several options at the click of the drop down box. Moreover, it offers remote reboot, easy control switching and so much more. Closing the program is as easy as hitting the big X on the interface. There are also tons of options for personalizing the screen resolution, speed quality and even the chance to have a multiple-monitor display.
The more recent versions have integrated VoIP audio and video conferencing to make it easier for multiple individuals to speak and communicate with each other as they share their screens.
The program also offers several options that allow you to decide the type of control you want to offer up for your computer. The options include: remote support, presentation, file transfer, or VPN. It automatically remembers the computers you have previously connected with so there's no need to worry about placing data all over again.
Overall, the program is easy to use and works wonderfully. Whether you use it with friends, family or maybe with co-workers; it makes file and screen sharing quite smooth and effortless.
Remote Assistance with TeamViewer
Introduction & Requirements
| Software you must download and install | |
| TeamViewer | |
| Required: You need to download TeamViewer from AfterDawn and install it. It also needs to be installed and running on the remote PC you wish to connect to. Download |
Download TeamViewer and install it on your computer. It must also be installed on the remote computer that you wish to connect to and control. TeamViewer is free for non-commercial use. Obviously both computers need to be connected to the Internet and a decent connection speed is suggested as you will be viewing the entire remote computer's Desktop from your computer.
TeamViewer Interface, I.D. and Password
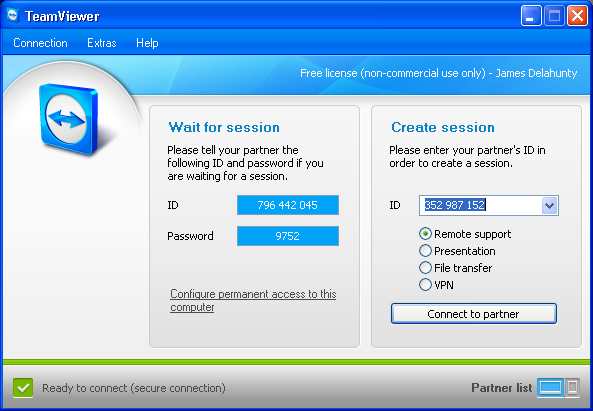
When you have the correct I.D. and password, type the I.D. into the ID field under "Create Session" as shown in the picture above. Make sure Remote Support is selected and click Connect to Partner.
Password Prompt
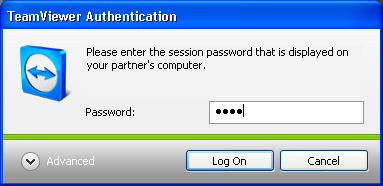
NOTE: If you want a password to be kept indefinitely for a remote machine, you will need to right click on the random password in TeamViewer when you are physically at the remote machine and click "Set user defined password").
Remote Desktop - First Look

Take note of the menu bar on the top of the Remote Desktop window. You have a red X to close the session at any time, Actions menu, View menu, Audio/Video menu, File Transfer button and Extras menu. Over the rest of this guide we will go through these options and see what they can do for us.
NOTE: How responsive the remote desktop will be largely depends on how good the connection is between both. Both Internet connections (for each computer) count when it comes to connection quality. There are a few settings we can change that can help with either speed or quality, but there is no substitute for a decent connection. Additionally, if there was CPU and RAM intensive tasks running on either computer (particularly the remote computer which is capturing and broadcasting its Desktop), that will also have a negative effect on performance.
Remote Desktop - Actions Menu
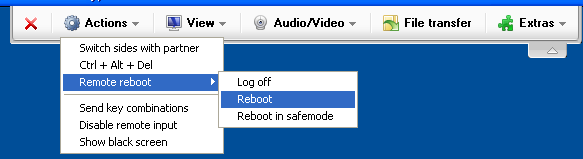
- Switch sides with partner: This option will literally turn the tables. Your Desktop will be streamed to the remote computer instead and the person at the remote computer (if any) could control your computer.
- CTRL + ALT + DEL: Sends the CTRL + ALT + DEL command to the remote computer (since pressing these keys yourself will bring up Task Manager or whatever is defined on your local machine).
- Remote reboot: If you need to Log Off the remote User Account or reboot it these are options for that.
- Send key combinations: Allows you to send keyboard combinations to the remote machine.
- Disable remote input: A user at the remote computer is able to do anything they like on the Desktop, but you can stop them by selecting this option
- Show black screen: Will show a black screen on the remote computer to give you some privacy. For this to be selectable you have to have Disable remote input selected too.
Remote Desktop - View Menu - Quality vs. Speed
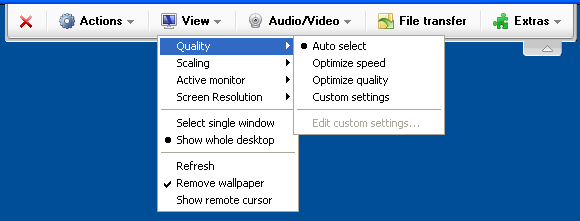
- Auto select: This option will determine the connection quality by itself and balance Speed vs. Quality automatically.
- Optimize speed: If you prefer speed and don't really care what the remote desktop looks like, choose this option.
- Optomize quality: If you don't mind any potential lag but you are put off by low quality picture, then choose this option.
- Custom settings: This setting will activate pre-defined custom settings related to quality and speed.
- Edit custom settings: Brings up a new window allowing you to change speed and quality settings
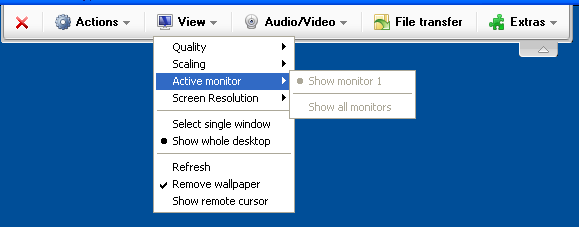
Remote Desktop - View Menu - Scaling & Active Monitor
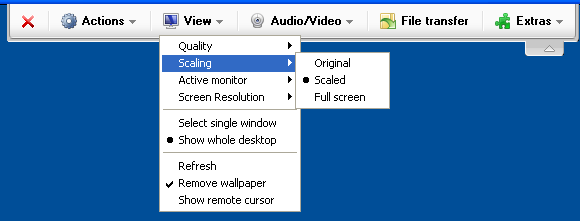
- Original: If this is set the screen from the desktop from the remote system will be displayed in its native resolution. This means that if the remote screen appears wider than your local screen, you will have to scroll back and forth in the remote desktop window. Likewise you may have to do the same if there is a significant different in height.
- Scaled: If this is set, TeamViewer will automatically adjust the display of the remote desktop on your computer so that you won't need to do any scrolling. It should fit comfortably in your monitor, but this may negatively affect quality.
- Full Screen: This will display the remote desktop in full screen on your computer. Some scaling still may occur or there could be a big black border at the end of the screen.
Now let's have a look at Screen Resolution settings.
Remote Desktop - View Menu - Resolution & More
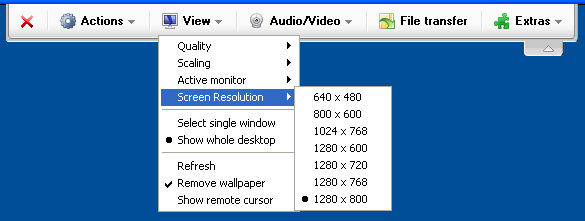
NOTE: Going for a lower resolution on the remote machine will cut down the amount of data that needs to be transfered between both computers, and so should result in a smoother response from the remote desktop.
Additionally, there are five things you can set in the View menu.
- Show single window: If you only want to work with one program at a time, you can select this option and then click on any active Window in the remote desktop and it will only broadcast that window to you. This can dramatically help with smoothness of response time from the remote machine.
- Show whole desktop: This is the default and displays the entire desktop. If you are displaying single windows, you may need to occasionally switch back to showing the entire desktop to change window.
- Refresh: Forces a screen refresh when automatic refresh fails (if the picture gets stuck).
- Remove wallpaper: Selected by default, this option automatically removes the wallpaper from a remote computer's Desktop background. The background will appear mid-session if it is switched off.
- Show remote cursor: As it says, this will display the cursor (pointer) on the remote screen, even if it is moved by the remote user (if any).
Communication - Audio/Video - VoIP
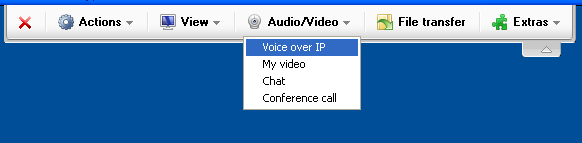
Now, for you the VoIP widget that pops up is a lot different for the remote user so it was important to show both.
Communication - Audio/Video - VoIP Local vs. Remote
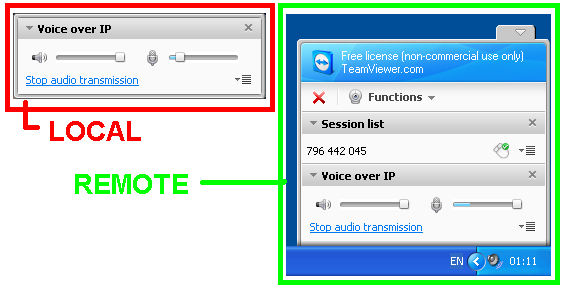
For the remote user, the VoIP widget emerges in the lower right hand corner of the screen as shown. Like the local user, the remote user has to click the "Transmit my audio now" link to start streaming sound from the mic.
Both users can stop streaming at any time by simply clicking "Stop audio transmission" which will have appeared as an option in the place of the former link to transmit the audio.
In conjunction with VoIP, you can also stream video from a webcam, as we will see now.
Communication - Audio/Video - Video

Like with the VoIP widgets, it will appear differently on both screens so it is important to point the differences out. Video quality, again, varies based on the quality of the established connections.
Communication - Audio/Video - Video Local vs. Remote
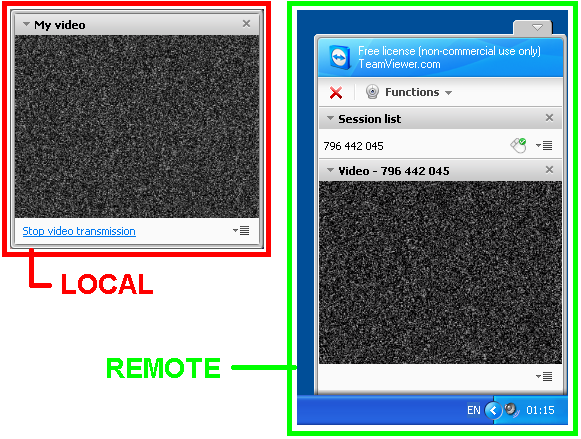
The widget will appear for the remote user in the lower right corner of the screen and if there is a webcam present or some video source, then there will also be a "Transmit my video now" link there too. Once clicked, it will change to Stop video transmission for both users who can use it at any time to cancel the video chat.
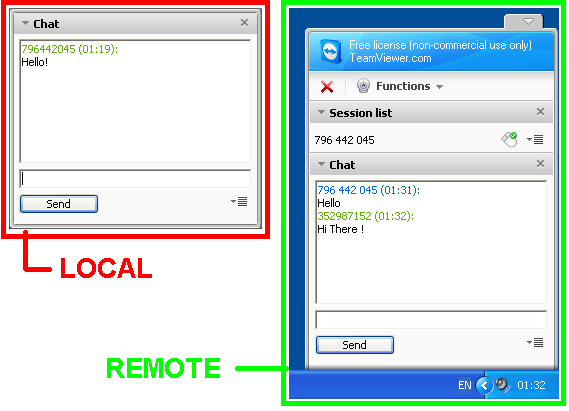
If you are already having problems with bandwidth, the best thing to do sometimes is to just use good old fashioned text chat which we will see next.
Communication - Audio/Video - Chat

Again, the widgets appear differently for both users so it is important to point that out. The chat should not really disturb the remote desktop performance in any way as text packets require much less bandwidth than video or audio transmissions.
Communication - Audio/Video - Chat Local vs. Remote
There is one last communication option left; Conference Call. If you are suffering from bandwidth restrictions but can use a phone easily, TeamViewer provides a phone number based on your country (make sure to check the charges) that you can call. There is also a link with a PIN that will connect you with the remote user.
I decided not to cover this because the whole point of the guide was to provide remote assistance and so assumes that the remote user is at the remote computer and has passed on the ID and Password to you in the first place. So it is safe to assume there is always communication of some sort happening.
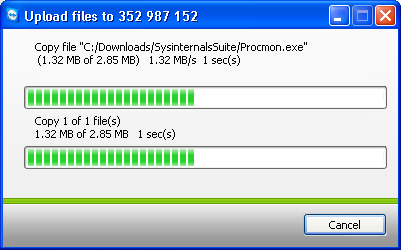
TeamViewer - File Transfer
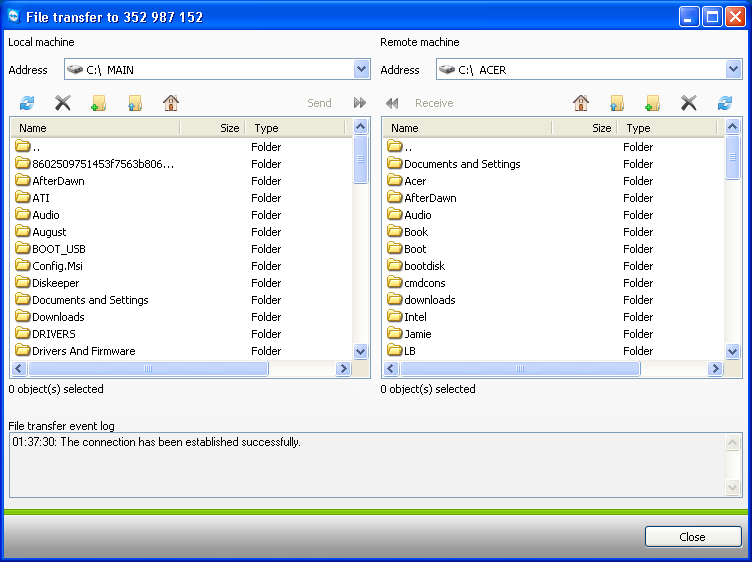
As mentioned it is designed sort of like a very basic FTP client. To upload a file to the remote computer, you just have to navigate first to the file (or folder) you want to send on the local machine side (left). Once you have selected the file, now use the file browser on the remote machine side (right) to open a directory that you want the files or folders to be sent to.
When you have that done, click the Send button which should not be active. The time an upload takes depends entirely on the available bandwidth on both ends, so large files might take a long time.
This is particularly useful for transferring files used for diagnosing problems, such as Process Exoplorer, Process Monitor, Autoruns or a malware removal tool of some kind.
TeamViewer - Uploading
When you have done click, click the Receive button which should then be active. Again, the download depends entirely on the available bandwidth at both ends of the connection.
The ability to download files is particularly useful for diagnosing problems too. For example, minidumps or even larger kernel memory dumps created after a system halt could be easily downloaded from a remote machine for local analysis.
TeamViewer is also capable of recording remote sessions to a local multimedia file (.tvs) for playback later.
Remote Desktop - Recording Session Video
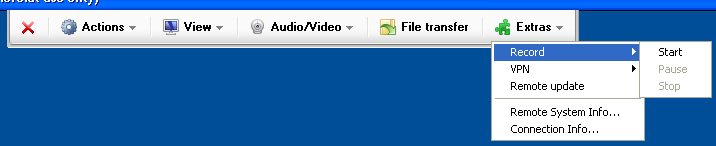
To stop the recording, simply go to Extras --> Record --> Pause, or Extras --> Record --> Stop.
NOTE: If you simply pause the recording you can resume it from that point at any time and it will record to the same .tvs video file. If you stop the recording however, a file browser will pop up and ask for a location and filename to save the recorded video.
To play back recorded videos later simply double-click the .tvs file in windows explorer and TeamViewer will launch automatically and play it, or alternatively go to the main TeamViewer window and click on Extras --> Play recorded session. Navigate to the .tvs file and open it and it will play back in TeamViewer.
If you would like to make recording sessions an automatic feature every time you use remote assistance, go to the main TeamViewer window and to Extras --> Options --> Remote Control and select "Automatically record remote sessions". You can also define a specific folder for the recordings to be saved.
Remote Desktop - Remote System Information
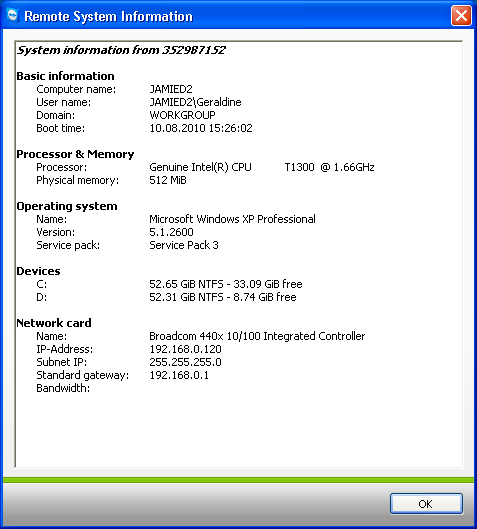
As shown above the program will now display information on the remote system that might be helpful for your purposes.
No comments:
Post a Comment